July 29, 2026 · 9 min read
Xcode Simulator to a store-ready screenshot set in 10 minutes
A simulator capture isn't a listing screenshot. Measured export sizes per device, the alpha channel in every default PNG, and the 10 minutes between them.
A simulator capture is not a listing screenshot. The capture is raw app UI, your source material. The listing screenshot is the thing you upload: usually that capture sitting inside a device frame, on a background, with a headline over it. The ten minutes is the distance between the two.
The simulator half is still worth setting up properly. Boot the right device, freeze the status bar so ten captures match each other, and know about the alpha channel that ships in every default PNG. Every number here comes from captures we took on this Mac, not from other posts.
All four simulators below were re-created and re-captured on 16 August 2026, on the iOS 26.5 runtime, and every dimension came back identical to the first measurement eighteen days earlier. The capture flags were re-run the same day, which turned up something we had previously asserted without measuring. More on that in step 3.
Read the chart description
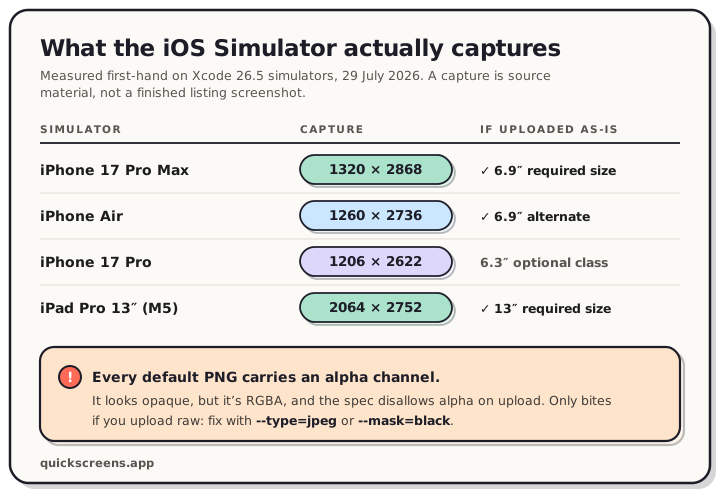
Measured capture dimensions from simulators on the iOS 26.5 runtime, first taken on 29 July 2026 and re-verified on 16 August 2026 under Xcode 26.6 with every dimension unchanged, and what App Store Connect would accept if the capture were uploaded as-is. iPhone 17 Pro Max captures at 1320 by 2868 pixels, a required 6.9 inch size. iPhone Air captures at 1260 by 2736, an accepted 6.9 inch alternate. iPhone 17 Pro captures at 1206 by 2622, the optional 6.3 inch class. iPad Pro 13 inch captures at 2064 by 2752, the required 13 inch size. Every default PNG carries an alpha channel, which the spec disallows on upload.
Step 1: Boot the simulators worth capturing from
Apple requires one iPhone size and, for iPad apps, one iPad size. Apple scales everything else from those, so two simulators cover the whole listing.
| Simulator | Writes | App Store class |
|---|---|---|
| iPhone 17 Pro Max | 1320 × 2868 | 6.9″, required |
| iPad Pro 13-inch (M5) | 2064 × 2752 | 13″, required for iPad apps |
Both of these land on a required store canvas exactly, which matters less than it first sounds. If you frame your captures, the capture gets scaled down inside the device frame anyway, so matching dimensions isn't the point. What you're buying is headroom: capture at the largest size in the class and you're never upscaling a small image to fill a big canvas. The one case where the dimensions matter directly is if you skip framing and upload the raw capture, which some developers do.
The iPad row is worth taking literally. Capture on a 13-inch simulator, not whichever iPad you happen to have configured. When we booted eleven iPad simulators and measured every one, the entry-level iPads (7th, 8th and 9th generation) all wrote 1620 × 2160, a size that appears nowhere in Apple's specification in either orientation. Only the 13-inch class is required, and Apple scales the smaller iPad classes down from it, so there is no reason to capture anywhere else.
Watch out for the near misses. The iPhone 17 Pro writes 1206 × 2622, which is the 6.3-inch class: a valid optional size, but not a substitute for the required one. The iPhone Air writes 1260 × 2736, which Apple does accept as a 6.9-inch alternate. Apple lists three accepted portrait sizes for the 6.9-inch class (1260 × 2736, 1290 × 2796 and 1320 × 2868), so more than one simulator can be correct. The full breakdown by display class lives in our App Store screenshot sizes reference.
Create and boot from the terminal:
xcrun simctl create qs-6.9 com.apple.CoreSimulator.SimDeviceType.iPhone-17-Pro-Max com.apple.CoreSimulator.SimRuntime.iOS-26-5
xcrun simctl boot qs-6.9
xcrun simctl bootstatus qs-6.9 -b
Step 2: Freeze the status bar
A real status bar leaks your carrier name, whatever battery level you're on, and the time you happened to capture at. Across ten screenshots it looks sloppy. One command fixes every capture that follows:
xcrun simctl status_bar booted override \
  --time "9:41" \
  --dataNetwork wifi --wifiMode active --wifiBars 3 \
  --cellularMode active --cellularBars 4 \
  --batteryState charged --batteryLevel 100
The override sticks until you run xcrun simctl status_bar booted clear. Run it before the first capture, not after, and your whole set stays consistent.
Step 3: Capture, and mind the alpha channel
The documented way to capture is one line:
xcrun simctl io booted screenshot shot-01.png
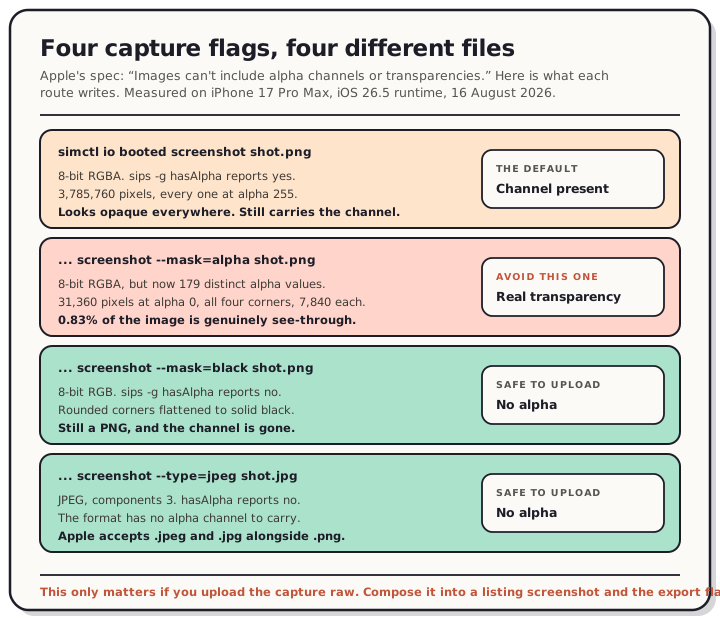
That default PNG is RGBA. We pulled the alpha channel out of the iPhone 17 Pro Max capture and counted it: 3,785,760 pixels, which is the whole image, and exactly one distinct alpha value across all of them, 255. So the image is completely opaque and previews fine everywhere you'd think to check. The alpha channel is still in the file, and sips -g hasAlpha says so.
Apple's screenshot specification is explicit: "Images can't include alpha channels or transparencies." So the file your capture tool hands you by default carries the one thing the spec rules out.
This only bites you on one path: uploading captures straight to App Store Connect. Compose them into a listing screenshot first and the export gets flattened on the way out, so the alpha channel never reaches Apple. If you are uploading raw, two flags solve it at capture time:
# JPEG: three components, no alpha
xcrun simctl io booted screenshot --type=jpeg shot-01.jpg

# PNG with the display mask flattened to black: RGB, no alpha
xcrun simctl io booted screenshot --mask=black shot-01.png
Read the chart description
Four ways to capture from the iOS Simulator and the measured contents of each file, captured from an iPhone 17 Pro Max on the iOS 26.5 runtime on 16 August 2026. The default command, xcrun simctl io booted screenshot, writes an 8-bit RGBA PNG that sips reports as having an alpha channel; all 3,785,760 pixels sit at alpha 255, a single distinct alpha value, so the image looks fully opaque while still carrying the channel. The mask equals alpha variant writes an 8-bit RGBA PNG with 179 distinct alpha values, of which 31,360 pixels are at alpha 0, and every one of those transparent pixels falls inside the four corner boxes at 7,840 per corner, amounting to 0.83 percent of the image; this is real transparency rather than a merely present channel. The mask equals black variant writes an 8-bit RGB PNG that sips reports as having no alpha, with the rounded corners flattened to black. The type equals jpeg variant writes a JPEG with three components and no alpha channel at all. Apple's screenshot specification states that images cannot include alpha channels or transparencies.
Then there's --mask=alpha, which is the one to skip. It uses the device's rounded-corner mask as premultiplied alpha, and we had said for three weeks that this "puts genuinely transparent pixels in the corners" without ever having counted them. So we counted them.
That capture comes back with 179 distinct alpha values instead of one, and 31,360 pixels sit at alpha 0. Every single one of them falls inside a 200-pixel box in one of the four corners, 7,840 per corner, with none anywhere else in the frame. It's 0.83% of the image, and it's the rounded corner arc rendered as real transparency rather than a channel that happens to be full. The claim was right. It's better with the number attached.
What happens if you upload one anyway, we can't tell you. We haven't tested a non-compliant upload, and neither store publishes rejection statistics. The narrower version is the useful one: the spec excludes alpha, --mask=alpha produces alpha, and the other two flags don't. Use one of those two. If you want the rest of the rules sorted by who actually enforces them, we wrote up the three rulebooks behind screenshot rejections.
This isn't an Apple quirk, either. adb screencap writes RGBA on Android as well, which we confirmed across three emulators and again on an Expo build, and Figma can't export a PNG without an alpha value at all. Different tools, same default, and both stores exclude it.
Step 4: Turn the captures into listing screenshots
This is the step where the two artifacts stop being the same thing. A bare UI shot asks the reader to work out the value themselves. Add a device frame, a background, and a short headline per screen stating one benefit.
Front-load the set. Apple's wording is that "the first one to three images will appear in search results when no app preview is available," which is conditional on both your orientation and whether you've uploaded a preview video, so treat it as a reason to lead with your strongest screen rather than as a fixed number. Play works differently again: across thirty listings we checked, its search card showed a screenshot zero times and served the feature graphic instead.
Size the captions for how small these get displayed. The App Store draws a 1,320-pixel upload at 220 CSS pixels on desktop and 144 on mobile web, a 6× to 9× linear reduction, so body-copy-sized text is gone before anyone reads it.
This is the step that used to mean opening a design tool and hand-managing canvas sizes. In the QuickScreens editor, you drop in the captures, pick the device frame, write the captions, and reorder the set by dragging. The canvas is already locked to the store's dimensions, so nothing you do can drift off-size.
Step 5: Export both stores from the same set
If you ship on Android too, don't rebuild the set. The Play requirements are different (1080 px minimum on the long edge, plus a 1024 × 500 feature graphic) and they're covered in the Google Play screenshot sizes reference. One project can export both, which is the difference between a ten-minute job and an afternoon.
Where the ten minutes goes
- Boot two simulators and override the status bar: 2 minutes.
- Navigate to the five screens worth showing and capture each: 3 minutes.
- Frame, caption and order the set: 4 minutes.
- Export both stores: 1 minute.
The slow part is deciding which five screens to show. That's a product decision, and it's worth more of your attention than anything else on this list.
This post covers the iOS simulator route specifically. For the shape of the whole job, including the Android side and what each step's measured constraint is, start from how to make App Store screenshots.
Frequently asked questions
Are simulator screenshots acceptable for the App Store? Yes. Apple validates dimensions, format and content, not which machine produced the image. Most listings don't upload the capture itself though: they upload a composed screenshot with the capture framed inside it, which is what the store artwork on nearly every polished listing actually is.
Which simulator gives the exact required iPhone size? iPhone 17 Pro Max, which writes 1320 × 2868 portrait. That's the largest of the three accepted 6.9-inch sizes, and one 6.9-inch set covers every iPhone through Apple's automatic scaling.
My capture looks fine but I've been told it's non-compliant. What's wrong with it?
If you're uploading captures directly, check for an alpha channel first. xcrun simctl io booted screenshot writes RGBA by default even though every pixel is fully opaque, and Apple's spec doesn't allow alpha channels. Run sips -g hasAlpha yourfile.png, and if it reports yes, recapture with --type=jpeg or --mask=black. We can't tell you how Apple treats a given upload, only what the published spec excludes and what each flag writes.
How do I get a clean 9:41 status bar?
Use xcrun simctl status_bar booted override --time "9:41" with the network and battery flags before you capture. It applies to every screenshot until you clear it.
Do I need a physical device for App Store screenshots? No. A device is useful for checking real-world performance and camera behavior, but for store artwork the simulator is faster, more repeatable, and gives you sizes a real device can't always produce.
Captures are the easy half. Open the editor, drop in your simulator PNGs, and export a store-exact set for both stores in a few minutes.